Showing posts with label healthy recipes. Show all posts

recipe: homemade yogurt by re-culturing

 It really is this EASY to make yogurt!

  1. Add 1 cup powdered whole milk and 3 1/2 cups water to a pan (or just use 3 1/2 cups already liquid milk).

  2. Increase temp to 180-195 degrees F on medium low. Keep it here for 10-20 min checking periodically with a thermometer.

  3. Remove from heat and let cool to 110-115 degrees F.

  4. To the 110-115 F milk, add a few spoonfuls from a store bought container of plain yogurt (or form your prior batch of yogurt) and whisk or stir. It's okay if there are some clumps.

  5. Pour into 2 pint jars and place in oven with the light on for 6+ hours.

Master Your Temperatures

Do your own research to ensure you are hitting the correct temperatures but these are the reliable basics I use to make fresh yogurt every 7-10 days. 

The best part? My cultures have been going active and strong now for almost a year now! In fact, the culture seems to be getting stronger over time. It now takes only four hours for my yogurt to fully solidify, compared to the six hours it took when I first started. Some yogurt makers on Reddit state that their culture gets weaker over time, but I have not found that to be the case at all.

Accurate Temperature Control

Maintaining the correct temperatures is the absolute key factor in making yogurt successfully:

- The heat stage (180-195 degrees F) - Heating your milk to this range kills competing bacteria so your yogurt culture can thrive. It also unravels the whey proteins so they can bond with the milk's casein, giving you a thick, smooth texture.

- The cool stage (110-115 degrees F) - You must ensure you do not add your starter culture to the milk until it has cooled below 115 degrees. Anything hotter will kill the beneficial bacteria. However, also ensure you do not let it cool below 110 before adding the yogurt and getting it into the warm oven as it needs to stay warm in order to turn into yogurt.

Customizing Your Texture and Batch Size

If you want prefer greek yogurt, you can easily strain the final product through cheesecloth to remove the liquid whey. However, I find this standard recipe is already perfectly thick, creamy and satisfying without any extra work.

This recipe yields two pint jars, which is the perfect amount for me as one person. It provides just enough to enjoy throughout the week without forcing you to eat yogurt every single day to finish it.

Keeping Your Culture Alive

Feel free to adjust the amount of milk to scale the batch size to your personal needs. Just remember the holden rule of sustainability: make your next batch within 7-10 days. This timeline allows you to use a small scoop of your current batch to safely innoculate the next one. Waiting longer than 10 days risks spoiling your yogurt and permanently weakening your live culture. 

homemade yogurt topped with raspberries walnuts and honey in a vintage jar set atop a red and white gingham napkin

nutty maple cinnamon granola

Even when other granola recipes cross my path, they rarely entice me to stray from my go-to granola. This is because it has the ideal balance of crunch (provided by the larger chopped walnuts compared to the softer and smaller crunch from chia seeds and hemp hearts), sweetness (just a hint of maple syrup), and a dash of spice (cinnamon). Mixing it up in five minutes before my shower, by the time I am out it is right on time to give the granola its first mix, and by the time my coffee is done, the granola is finished baking and ready to top my yogurt. 

mixing up a batch of homemade nutty maple cinnamon granola

Nutty Maple Cinnamon Granola

Prep Time: 5 minutes

Total Time: 35 minutes

Equipment: large mixing bowl, large spatula/spoon, measuring cups and spoons, baking sheet (either half sheet or full sheet will work just fine)

Ingredients:

Dry - 

4 cups preferred oats (Old fashioned, also called rolled oats, provide a slightly crunchier texture and will possibly clump better. However, I use quick oats because I like the softer texture in the final granola and no clumps).

1 cup chopped walnuts (subbing pecans is also wonderful)

1 cup pumpkin seeds (with or without salt, either works)

1/2 cup hemp hearts

1/4 cup chia seeds

1/4 cup of something else (I switch this up depending on what I have on hand - sunflower seeds, wheat germ, 

1 tsp ground cinnamon (Don't throw out the cinnamon you have in your cupboard, however, when you replenish your cinnamon you want to be using ceylon cinnamon as it has the lowest coumarin content versus cassia and saigon. This article provides a quick summary of how you can quickly exceed the daily limit of cassia/saigon Cinnamon, potentially causing damage to your liver.)

Wet -

1/3 cup oil (If I feel like taking the time, I melt coconut oil. But, typically I just use grapeseed oil that is already in a "state" I can dump into the granola mix. If you do use coconut oil, mix your ingredients and get it in the oven quickly so it doesn't start hardening again.)

1/2 cup maple syrup (You can sub honey, however, anytime you heat honey over approximately 95 degrees, it significantly degrades beneficial enzymes, antioxidants, and antibacterial compounds, reducing its nutritional and potential health benefits. So, I tend to use honey for room temp, or at least not boiling uses, and stick to maple syrup for everything else.)

1 tsp vanilla extract

Instructions:

1) Add all of the dry ingredients to a large bowl and mix well. 

2) Add wet ingredients to the bowl, no need to mix these in a separate bowl first.

3) Dump onto your baking sheet and loosely smooth the granola to cover the entire pan.

4) Bake at 350 for 30 minutes, turning with the same spatula or spoon you used for mixing, about halfway through. You want the granola medium brown and just slightly crispy. 

Notes:

Same some trees and don't use parchment paper. I have never had this stick to the pan even a little. 

If you want to add fruit, add it to the pan right when you take the granola out of the oven so it gently toasts it without burning. Or, just add it right before you eat the granola in cereal or on top of yogurt. This way it is not adding moisture into the granola during storage.

a pan of homemade nutty maple cinnamon granola out of the oven a spoon holding up the homemade granola to show the carmel color and subtle crunch

Don't forget to pin this post if you remember so you remember to try this granola recipe. It will surely be your "go-to" granola recipe as well!

nutty maple cinnamon granola recipe

spiced currant nut muffins

Whipped up these spiced currant nut muffins as a thank you to my neighbors for helping me get my car battery charged after it died. They said these were delicious and had the perfect amount of sweetness. I agree! They are great any time of year. However, with hints of pumpkin and cinnamon, they are particularly perfect for Fall. But, I doubt I'll be able to wait until then to make them again!

a baking pan filled with muffinsa hand holding a spiced currant nut muffins with the cupcake liner folded back and a bite taken out of it

Spiced Currant Nut Muffins

Prep Time: 15 minutes

Total Time: 35 minutes

Equipment: two mixing bowls, whisk, spatula, large ice cream scoop, standard muffin tin

Ingredients:

Dry - 

1 cup whole wheat flour

1 cup rolled oats

3/4 cup brown sugar 

2 tsp baking powder

1/4 tsp baking soda

1/2 tsp salt

2 tsp pumpkin pie spice

1 tsp cinnamon 

Wet - 

2 eggs (beaten)

1/2 cup butter

1/4 cup buttermilk

1/4 cup applesauce

2 tsp vanilla extract

Mix-Ins (both optional) - 

1 cup chopped walnuts

1/2 cup currants (or other dried fruit you have on hand)

Instructions:

1) Mix dry ingredients in a medium bowl and wet ingredients in a separate slightly larger bowl.

2) Add dry ingredients into the bowl of wet ingredients and mix well.

3) Add in walnuts and dried fruit.

4) Use large ice cream scoop to drop batter into 12 regular muffin tins lined with baking papers. 

5) Top with a sprinkle of rolled oats.

6) Bake at 350 degrees fahrenheit for 20 minutes, checking for doneness by inserting a toothpick in the center of a muffin and ensuring it comes out clean. They may need another two minutes or so more, depending on your oven.

Note: These muffins rise enough for my preference. However, if you want them loftier, you can try adding the whole wheat flour into the wet ingredients to sit for 10 minutes or so absorbing some of the liquid while you work on getting the rest of the recipe prepped.

Don't forget to pin this post if you want to remember the recipe for the next time you need a quick muffin recipe to offer as a gift of gratitude when someone helps you like my neighbors did for me.

a hand holding a muffin with the baking pan in the distance and a color blocked graphic to the left with the title of the recipe and a sentence from the first paragraph of the blog post

tahini yogurt chicken salad lettuce wraps

This is hands down the best chicken salad I've ever had.

The turmeric, cumin, cinnamon, and dijon are such a wonderful, unique flavor combo. And, with the yogurt and tahini base, I feel a little more healthy than if I was eating chicken slathered in mayo. It takes a it longer than expected to chop and combine all the different components. But, the varying textures and ratio of flavor are well worth the effort!

a hand holding a buttercrunch lettuce leaf with a dollop of chicken salad in it and more wraps beyond on a white plate three buttercrunch lettuce leaves on a white plate with a dollop of chicken salad in the middle of each one

I highly recommend wrapping the chicken salad in the leaves of buttercrunch lettuce. It imparts such a satisfying crunch (quite literally) it's buttercrunch lettuce ;) If you wanted to get more greens in your diet, you could easily cut back the amount of chicken salad on each lettuce leaf by about 1/4 of what I have shown in the photos and still have more than enough balance of chicken salad to lettuce.

You also could add a third can of chicken (using the same amount of dressing) and the chicken would have more than enough seasoning.

Tahini Yogurt Chicken Salad Lettuce Wraps

Prep time: 15 minutes

Total time: 15 minutes

Serves: 2

Equipment: bowl, measuring spoons, measuring cups, medium spatula

Ingredients:

2 cans chicken in water (5 oz each)

1/2 cup whole milk yogurt

1 tbsp tahini

1 tsp dijon mustard

1/2 tsp turmeric

1/2 tsp cumin

1/2 tsp cinnamon

1/4 tsp salt

1/2 cup dried currants (or whatever dried berries you have on hand)

1/3 cup diced green onion

1/4 cup chopped parsley

1/3 cup chopped pecans (sub chopped walnuts, if desired)

1 head buttercrunch lettuce

Instructions:

1) In a bowl, mix together yogurt, tahini, mustard, turmeric, cumin, cinnamon, and salt.

2) Fold in the remaining ingredients.

3) Dollop onto individual lettuce leaves for serving.

4) Enjoy!

a hand holding a buttercrunch lettuce leaf with chicken salad in it and a bite has been taken the ingredients for the chicken salad each ingredient in an individual bowl

This recipe, as written and the amount of chicken salad I have on each lettuce cup in the photos, is enough for two lunches for just me if it is all I am eating (no sides, other than maybe an orange). When I have a side (still using the amount of chicken salad shown on each lettuce leaf), this easily makes food savings. However, if you put less chicken salad on each lettuce cup and/or added another can of chicken, this could stretch much further - if you're wanting to make appetizers, for example.

I used one head of buttercrunch lettuce to provide enough leaves for the amount of chicken salad shown on each in the photos. So, buy an additional head (or heads) of lettuce as needed if you plan on placing less chicken salad on each leaf.

Side note - did you know you can plant the root of your buttercrunch lettuce in dirt and it will regrow a few times into a new head of lettuce?? Yes, even the lettuce you buy in a package from the store. It still grows again and again! Quite amazing. See the new green growth poking out in just the weeks time since I used up this lettuce and planted it?

a buttercrunch lettuce root planted in a pot in dirt and starting to regrow new green leaves

Don't forget to pin this post if you want to remember the recipe for the next time you need a simple, yet delicious, meal!

a hand holding a closeup of chicken salad in a buttercrunch lettuce leaf and on the left the image states the name of the recipe

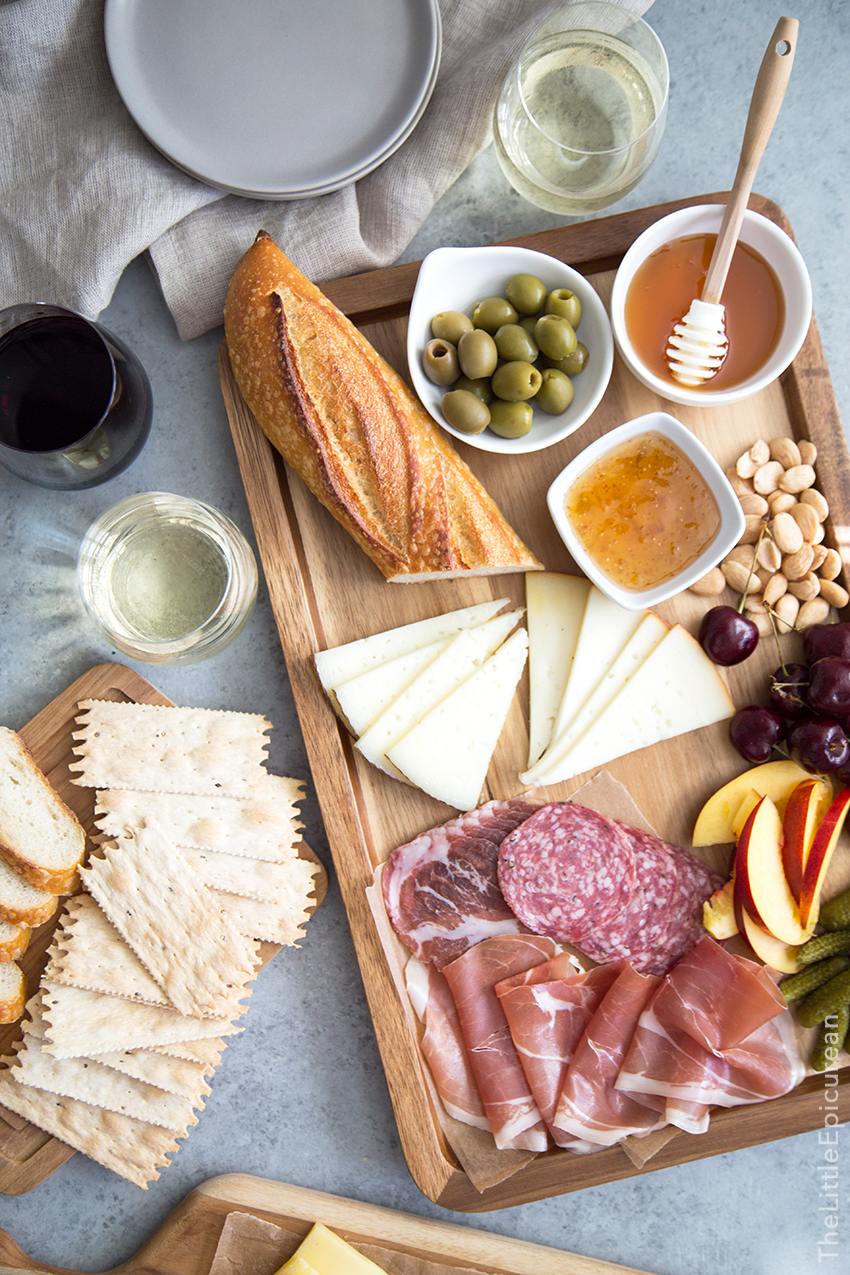
CRUDITE, CHEESE, AND CHARCUTERIE APPETIZER PLATTERS

For dinner, I often grab hummus, some veggies, olives, nuts, and some cheese (of course!) to make a quick and delish meal of random items in my fridge and pantry. It's such an easy way to sit down and eat a healthy meal after a long day with minimal prep. I've been to a number of events where a platter, or even a spread of them, were laid out in such a beautiful way. They most likely are not as easy as they appear, taking some artful skill to achieve balance and interest. So, I gathered some inspiration to model after. And, in turn, I am certainly inspired to add some different types and flavors of items to my repertoire! I was curious to know what the difference is between the different boards I was seeing. Turns out... 

CHARCUTERIE REFERS TO THE MEAT PORTION OF THE PLATTER, CRUDITES ARE THE CHOPPED VEGETABLES. AND, OF COURSE, A CHEESE PLATTER IS JUST THAT - MADE UP OF CHEESE. OF COURSE YOU COULD HAVE A MIX OF ALL OF THESE AS WELL - IN ADDITION TO JAMS, FRUITS, NUTS, ETC TO ADD COLOR, TEXTURE, AND FLAVOR!

Below are some of my favorites. The bright boards would be perfect for Summer and I love the assortments with deep hues and richer flavors for Fall! I also included a platter, which is technically a nicoise salad. This originated in France and is traditionally made with tomatoes, hard-boiled eggs, olives, anchovies or tuna, and dressed with olive oil. Additionally, there were some boards comprised of items that could be layered together to make fajitas or the like. The sky seems to be the limit! 


via Crowded Kitchen


via Always Order Dessert


via Anett Velsberg

LENTIL SOUP

On cold winter days such as these, it's nice to stay inside and enjoy a warm pot of soup. Most types of soup come together quickly, are inexpensive, and fill the house with a wonderful smell! This lentil soup is a keeper. I didn't bother slicing the spinach, throwing the leaves in whole to wilt instead. And, topped with a dollop of plain Greek yogurt, which is a healthier way to mimic sour cream, it thickens it up nicely. All it needs is a loaf of bread straight out of the oven to soak up the juice!


Lentil Soup

Makes: 6 servings

Ingredients:
1 onion, chopped
1/4 c olive oil
2 carrots, diced
2 stalks celery, chopped
2 cloves garlic, minced
1 tsp dried oregano
1 bay leaf
1 tsp dried basil
1 - 14.5 oz crushed tomatoes 
2 c dry lentils
8 c chicken broth
1/2 c spinach 
2 tbsp vinegar
salt to taste
ground pepper to taste

Directions:
1) In a large soup pot, heat oil over medium heat. 
2) Add onions, carrots, and celery; cook and stir until onion is tender.
3) Stir in garlic, bay leaf, oregano, and basil; cook for 2 minutes.
4) Stir in lentils, and add water and tomatoes. 
5) Bring to a boil.
6) Reduce heat, and simmer for at least 1 hour.
7) When ready to serve stir in spinach, and cook until it wilts. 
8) Stir in vinegar, and season to taste with salt and pepper, and more vinegar if desired.

HEALTHY ZUCCHINI BREAD


We always had a garden growing up - with sweet peas, zucchini, carrots, rhubarb...  I would pick fresh vegetables straight from the earth, wash them off under the spigot, and pop them in my mouth.  The zucchini was baked into bread, it seems almost daily.  I loved to bake bread!!  I don't remember who's recipe I used when I was little, but when my neighbor gifted me the hugest zucchini I've ever seen from her friends garden a few weeks ago, I went to my moms blog to search for a zucchini bread recipe.  


AND, IT'S A KEEPER!


I feel like it is so hard to find one that is a bit more healthy that is still sweet and moist.  And, this is it!  Zucchini is in season from June through August in most parts of the country so we're ending peak season.

BUT, IT'S NOT TOO LATE TO GET A FEW LOAVES IN!!


Zucchini Bread

Makes: 2 loaves

Ingredients:
3 eggs
1/2 c oil
1/2 c applesauce
1 c sugar
2 tsp vanilla
2 c grated zucchini
2 1/2 c flour (I used 1 1/2 c unbleached all-purpose flour + 1 c whole wheat pastry flour)
1/2 c oatmeal
1 tsp baking soda
1/2 tsp baking powder
1 tsp salt
4 tsp cinnamon
1/2 c chopped walnuts or pecans

Directions:
1) Preheat oven to 325.
2) Grease and flour 2 small loaf pans (4 1/2 x 8 1/2).
3) Beat eggs. Add oil, applesauce, sugar, vanilla, and zucchini. Mix together. Add dry ingredients.
4) Pour into loaf pans.
5) Bake for 1 hour (or until a flat toothpick inserted comes out clean). Note: I like to underbake my bread slightly so it is more moist.

CHICKPEA CURRY SALAD SANDWICHES


I love the internet, pinterest, instagram, blogs...  


BUT, I HAVE A LOVE FOR PAPER MAGAZINES AND BOOKS EVEN MORE.

So, yes I still tear pages from magazines and cook from them or collage them in my many binders of inspiration.  I tore this recipe for Chickpea Curry Salad Sandwiches from Parade magazine and whipped them up this past weekend.  They were a welcome change from all of the avocado toasts I have been addicted to the past year or two.  Although, I felt they needed a dash more flavor from an additional green onion.  What do you know, when I went to the original recipe from Sarah Britton's in her cookbook, Naturally Nourished, the only variation was two green onions vs one! 


I MIGHT BE GETTING GOOD AT THIS WHOLE COOKING THING!


The recipe below is the original from Sarah Britton.

Chickpea Curry Salad Sandwiches

Makes: 8 to 10 sandwiches

Ingredients:
6 tbsp mayonnaise
1 tbsp curry powder
1 1/2 tsp freshly squeezed lemon juice
fine sea salt
freshly ground pepper
3 cups (2 15-oz cans) cooked chickpeas, drained and rinsed
1 oz raw pecans (approx. 1/8 cup)
3 tbsp raisins
1 stalk celery
2 spring onions
6 to 8 slices whole-grain bread
crisp lettuce or sprouts
sliced red onion or shallots (optional)

Directions:
1) Make the dressing: In a small bowl, whisk together the mayonnaise, curry powder, lemon juice, salt, and pepper.  Season with more salt, if necessary.
2) in a food processor, pulse the chickpeas to roughly chop them - do not overprocess or you'll end up with chickpea puree.  You can also do this step by hand.
3) Chop the pecans and raisins, then dice the celery and onions.
4) In a large bowl, combine the chopped chickpeas with the dressing.  Add the pecans, raisins, celery, and onions and fold to combine.  Season with salt.  Enjoy the salad on bread with lettuce and onion slices, if desired.

warm white bean salad with arugula pesto and preserved lemon

My family has grown quite significantly over the years, from five in my immediate family to now brother-in-laws as well as seven nieces and nephews between my two older sisters.  When I was in college and my sisters were newly married and later young mothers, we started doing a secret santa gift exchange to save money and unnecessary purchasing.  My cousin would draw names and email each of us the one (adult) person we were to buy a gift for, and over Thanksgiving when we were typically all able to get together we would go around in a circle and open them.  With just one person to focus on, it opened up a lot of time (and fun) to find the absolute perfect gift.  I still have the custom skull high top Converse sneakers with pink laces my brother-in-law got me.  After quite a few years of doing a secret santa, we all decided we missed a little the joy that comes from gifting to others, and decided to open up the possibilities a bit.  However, we didn't go back to buying gifts for everyone.  Instead, for Christmas as well as for birthdays, mothers day, fathers day, and the like, we would purchase if it was within our means and we happened across something perfect throughout the year, but no obligation.  So, a present might come on your birthday in August or a present might randomly show up in June when you were least expecting it.  Oh what more fun!  This is what happened a few months when a box was unexpectedly leaning up against my door upon arriving home.  I opened it to find a copy of "Dinner: Changing The Game" by Melissa Clark.  Had this been shipped to me by mistake?  No, the address is correct.  Is there a note inside?  Nope.  Hmmm.  One of my sisters had texted a few days prior to double check my address, so I texted her.  Bingo.  A good friend of hers had said the cookbook was amazing and had been getting rave reviews so she bought one for herself and for me.  How thoughtful.  And unexpected.  And something we can now share as sisters.  All Summer long, we've been communicating back and forth with which recipes we have tried, how they turned out, and what the next ones on our list are (she was surprised I listed the Warm Squid Salad, but I'm sticking to my guns!).


Melissa's goal with "Dinner" was to help us figure out what to make for dinner without falling back on what we've eaten before, to give choices and help expand the way we think about dinner so cooking it becomes "one of the most satisfying and loveliest moments of the day."  She provides a list of ingredients to keep on hand and the history and uses behind them in the front of the cookbook.  The list can seem a little daunting as they're not all your average pantry staples (sumac, kimchi, and thai red curry paste to name a few).  But, I poured over this cookbook for hours the first day totally immersed in how attainable Melissa made incorporating these ingredients into anyone's arsenal.

The first recipe I made from "Dinner" was the Warm White Bean Salad with Arugula Pesto and Preserved Lemon.  I was drawn to it because it seemed like a nice light salad for Summer, but also because it would teach me how to make a version of pesto, which I could translate later for many other dishes if it became part of my "arsenal."


Most of the ingredients I had on hand, and the others I quickly scooped up from the local supermarket...except for the preserved lemon, lemons that have been pickled in salt and their own juices.  I hunted all over the store to no avail.  Check back tomorrow for more info on how to make your own preserved lemon, in no time at all!


Total time: 20 minutes
Serves 4

Ingredients:
6 to 8 cups arugula
1/3 cup sliced almonds
1/4 cup grated Parmigiano-Reggiano cheese
2 1/2 tbsp chopped preserved lemon
1 garlic clove, chopped
1/4 tsp kosher salt, plus more to taste
1/3 cup extra-virgin olive oil, plus more to taste
3 cups cooked white beans, rinsed and drained
fresh lemon juice to taste
freshly ground black pepper to taste
2 to 3 tbsp thinly shaved shallot or red onion (optional)

Directions:
1) In a food processor or blender, combine 2 packed cups of the arugula with the almonds, cheese, preserved lemon, garlic, and the 1/4 teaspoon salt.  Process or blend until everything is finely chopped.  With the motor running, blend in the 1/3 cup olive oil.  
2) Warm the beans in the microwave for about 1 minute, or in a small pot on the stovetop for about 2 to 3 minutes.  The beans should be warm to the touch, but not hot.
3) In a medium bowl, toss the arugula pesto with the warm beans, and adjust the seasoning to taste.
4) In a large bowl, toss the remaining arugula with lemon juice, a drizzle of olive oil, and salt and pepper to taste.  (If you're unsure, add the seasonings a little at a time, tasting as you go, until you like it.  Be generous with the black pepper.)  Arrange the arugula salad on a large platter, and spoon the beans on top.  Sprinkle the shaved shallots over the beans, and serve.

YOGURT AND FRESH BERRY PARFAIT

I've always adhered to the mantra that "breakfast is the most important meal of the day."  My mom made for me (and still makes me when I go home to visit) a giant bowl of oatmeal for breakfast layered with raisins, flax seed, walnuts, and whole milk.  She taught me that a hearty breakfast and a healthy lunch will power you through the day, while a lighter dinner like a salad is all your body needs as it is about to go into rest. Her salads are no mean "light," containing a mix of greens, carrots, peppers, cucumbers, and Braggs nutritional yeast.  But, it makes sense to feed your body fuel when you need it and go lighter when it doesn't.

So, every morning for breakfast I scoop either oatmeal or yogurt into a mason jar for an easy, but hearty, grab and go on the way to work.  Summer weather has me gravitating towards the yogurt for obvious reasons (and the plethora of fresh berries at the grocery store make it a no-brainer as well).


I start with either organic whole milk plain yogurt or whole milk greek yogurt, then sprinkle some chopped walnuts on top.


Add some fresh raspberries, blueberries, or sliced bananas and drizzle with honey.


Repeat a second time and you've got a quick and delicious portable breakfast!


Many people (or most people I would garner to say) are nervous to choose whole over non-fat when staring at the cooler in the grocery store.  However, many studies have found consuming whole milk actually has numerous benefits compared to its lesser fat counterparts.  "At the simplest level, people eating more high fat dairy products will have enough calories so they won't feel hungry enough to need additional calories from sugary foods." (1)  "When people reduce the amount of fat they eat, they tend to increase their intake of refined carbohydrates and sugar, the driving forces behind the bulk of our nation's chronic health problems." (2)

Choosing regular vs greek yogurt is primarily based on taste and texture preference since they are deniably different.  However, greek yogurt does have an edge with protein and sugar.  "In roughly the same amount of calories, it (greek yogurt) can pack up to double the protein, while cutting sugar content in half." (3)

I have yet to try overnight oats despite not being a picky eater, I am wary that I would not like the texture.  Do you have any favorite overnight oats recipes that might overcome my hesitations?  What are some of your favorite things to make for breakfast on-the-go?

(1) Source: Time magazine
(2) Source: US News
(3) Source: US News