Showing posts with label cupcake liners and toppers. Show all posts

vintage railroad train party

This vintage railroad train party by Kelly of kellyallison photography has got to be the most inspiring train party we have seen. So many amazing details!

The calendar at the bottom of the invite acts as a train ticket, with the date of the party punched for reference...
Guests are greeted with engineer caps and neckerchiefs upon arrival, setting the stage for their train journey...
A vintage Fischer Price train delivers veggies & hummus to the table with the help of paper cup cargo cars...
Pb&j sandwiches are cut to look like train engines and passenger cars...
Mini hotdogs are served chicago-style with mustard and a pickle spear nestled inside, what else?, but a flattened striped cupcake liner. Condiments are served in striped candy cups...
Juice boxes are served in muslin sacks (DIY design created from iron-on inkjet paper). And, did you know that vintage style paper straws fit perfectly in standard juice boxes? Much cuter than the plastic version...
Popcorn, chips and pretzels served in white paper cones, much like what you'd be able to buy from old station vending carts...
Yogurt parfaits with granola and blueberries look great when served in mini jam jars. The lids are topped with a square of burlap, and a wooden spoon is secured with bakers twine. To add a bit of color and continue your theme, decorate cutlery with washi tape on the handle!...
Cupcakes served in a vintage suitcase are baked in striped candy cups, and topped with marzipan R/R crossing signs...
Clear red striped loot bags are adorned with DIY labels...
For more details, visit Hostess with the Mostess.

cupid's arrow red velvet cupcakes

Bakerella is always whipping up something yummy and creative, and these cupid's arrow red velvet cupcakes don't disappoint..
Head on over to Bakerella for the recipe, free PDF printable arrows, and project directions. For, solid red cupcake liners similar to those used, visit the fort & field shop.

cupcake liner christmas trees

Another really creative use of cupcake liners inspired by The Cake Blog's cupcake liner tree toppers...paper Christmas trees by A Spoonful of Sugar Designs...
Supplies:
- polystyrene cone (from craft stores)
- cupcake liners - approx 12 for each tree (A Spoonful of Sugar Designs used red and white gingham cupcake liners and red and white wide striped cupcake liners, but a range of designs can be found here).
- sequin pins

Directions: Remove the bases of the cupcake liners. Pin each layer around the polystyrene cone, starting at the bottom. The bottom layers will need two strips (cut strips to fit). Each layer overlaps the one below it by approx 1/4 inch to cover the pins. When you get to the top, cut a complete cupcake liner in half. Fold that in half again so you have a quarter. Bend each side around to form a mini cone shape, pop that on top, and secure with pins ( you could use tape to hold the top together if you prefer). This gives it a nice pointy tip.
In no time at all, you have a cheerful forest of trees...

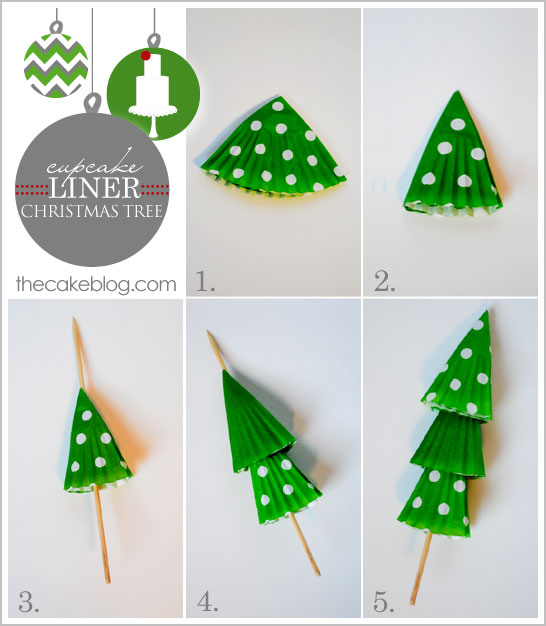
cupcake liner christmas tree toppers

There are so many more uses to cupcake liners than baking!...cupcake liner garland, cupcake liner accented gift wrap, and so much more! For Christmas, we are loving these cupcake liner Christmas trees...
Supplies:
Cupcake Liners
- Double Sided Tape
- Extra Long Toothpicks (or mini skewers)

Instructions:
Grab a regular sized cupcake liner. Fold liner in half. Fold in half again, creating a pie-like wedge. Tape the two flaps together using double sided tape, so that you have one solid triangle. Fold in half again. Tape again. Now you should have a tall skinny wedge that is 1/8 the size of your original circle. If your liner is now a flat triangle due to folding, fluff it up with your finger so that it makes a cone. Insert your toothpick through the center of your cone. Slide it down about half way. This is the bottom tier of your tree. Repeat folding steps 1 – 2 with another cupcake liner. Mixing in another pattern or color adds to the fun! Slide this onto your toothpick creating the middle tier. Repeat folding steps 1-2 with a third and final cupcake liner. Place this last liner on the top of your toothpick to complete your tree. Smush, crinkle and/or adjust layers until you’re satisfied with your tree. Insert into cupcake and enjoy!

For cupcake liners similar to those The Cake Blog used, find solid green cupcake liners and green and white polka dot cupcake liners in the fort & field shop.

caramel apple cupcakes

The Recipe Critic shares a recipe for caramel apple cupcakes...
Ingredients:
1-1/4 cups flour
2 teaspoons baking powder
1/2 teaspoon ground cinnamon
1/2 teaspoon salt
2 eggs, room temperature
1/2 cup packed light brown sugar
1/2 cup granulated sugar
1/2 cup vegetable oil
2 teaspoons pure vanilla extract
2-3 Granny Smith or Rome apples (about 1 pound), peeled and shredded
1-1/2 cups chewy caramel candies
1 Tablespoon heavy cream

Preheat oven to 350 degrees Fairenheit. Line a cupcake pan with baking liners. In a large bowl, whisk together the flour, baking powder, cinnamon and salt. Grate your apples to ensure you'll get apple with every bite of caramel. In a medium bowl, whisk together the eggs, brown sugar and granulated sugars until smooth. Whisk in the oil and vanilla. Stir into the flour mixture until just combined; stir in the apples. Spoon the batter into the prepared pan until almost full. Bake until golden and a toothpick inserted in the center comes out dry, 25 to 30 minutes. Transfer to a rack to cool completely.

In a small, microwavable bowl, combine the caramels and cream. Microwave in 30 second intervals, stirring between each one until caramel is melted and smooth. Dip cupcakes upside down into caramel and let cool.

For solid red cupcake liners similar to those used, visit the fort & field shop.

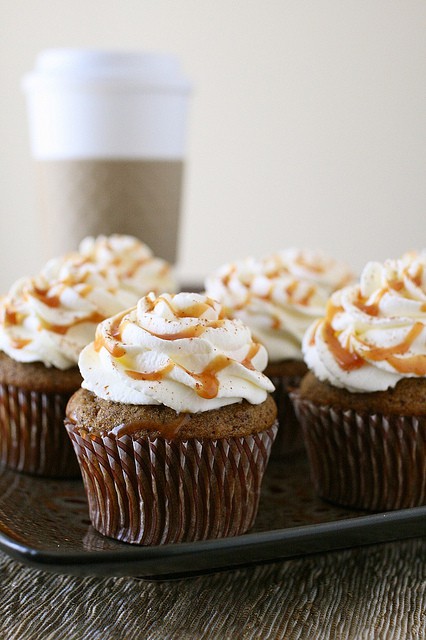
pumpkin spice latte cupcakes

Annie's Eats shares a pumpkin spice latte cupcake recipe that just feels so fall...
Pumpkin Spice Latte Cupcakes
Yield: about 2 dozen cupcakes

Ingredients:
2 2/3 cups all-purpose flour
3 tbsp. espresso powder
2 tsp. baking soda
2 tsp. baking powder
1 tsp. ground cinnamon
1/8 tsp. grated nutmeg
1/8 tsp. ground cloves
1 tsp. salt
1 (15 oz.) can pumpkin puree
1 cup sugar
1 cup brown sugar
1 cup canola or vegetable oil
4 large eggs
½ cup coffee or espresso, for brushing

For the frosting:
2¼ cups heavy cream, chilled
¼ cup confectioners’ sugar

To finish:
Ground cinnamon
Caramel sauce

Directions:
To make the cupcakes, preheat the oven to 350°F. Line cupcake pans with paper liners. In a medium bowl, combine the flour, espresso powder, baking soda, baking powder, cinnamon, nutmeg, cloves and salt. Stir together and set aside. In the bowl of an electric mixer, blend together the pumpkin, granulated sugar, brown sugar and oil. Add the eggs one at a time, beating well after each addition. With the mixture on low speed, add the flour mixture in two additions, mixing just until incorporated. Fill the cupcake liners about three-quarters full. Bake until the cupcakes are golden and a toothpick inserted into the center comes out clean, 18-20 minutes. Transfer the pans to a wire rack and let cool for 10 minutes, then remove the cupcakes from the pans. While the cupcakes are still warm, brush them two or three times with the coffee or espresso, allowing the first coat to soak in before repeating. Let cool completely.

To make the frosting, place the heavy cream in the bowl of an electric mixer fitted with the whisk attachment. Whip on medium-low speed at first, gradually increasing to high speed. Blend in the confectioners’ sugar gradually. Whip until stiff peaks form, being careful not to over-beat. Use a pastry bag fitted with a decorative tip to frost the cooled cupcakes. Sprinkle with ground cinnamon and drizzle with caramel sauce. Store in an airtight container and refrigerate.

Vanilla Bean Carmel Sauce
Yield: 1½ cups

Ingredients:
1 cup sugar
1¼ cups heavy cream
1 vanilla bean, split lengthwise
¼ tsp. coarse salt
½ tsp. vanilla extract

Directions:
Spread the sugar in an even layer over the bottom of a large, heavy-bottomed saucepan. Place over medium-low heat, watching carefully. When the sugar begins to liquefy around the edges, use a heatproof spatula to gently stir it towards the center. Continue stirring very gently until all the sugar is melted, taking care not to over stir. Measure out the heavy cream in a liquid measuring cup and scrape the seeds from the vanilla bean into the cream. Set aside. Once the caramel reaches a deep amber color, immediately remove the sauce pan from the heat. (To test the color, spoon a drop onto a white plate or bowl.) Carefully whisk in half of the heavy cream along with the vanilla bean seeds. The mixture will steam and bubble violently. Stir until the cream is well incorporated, then whisk in the remaining cream. Stir in the salt and the vanilla. If any sugar has hardened, place the saucepan over low heat and whisk until smooth. Store in an airtight container in the refrigerator. If needed, it can be rewarmed in the microwave or in a saucepan over low heat.

For chocolate brown striped cupcake liners like Annie's Eats used, visit the fort & field shop.

Swan Lake cupcake toppers

Movita Beaucoup shares directions to transform vintage style ballerina cupcake toppers into beautiful Swan Lake cupcake toppers by adding a little paint, glitter, and feathers...
Find complete directions at Movita Beaucoup and get your own vintage style ballerina cupcake toppers in the fort & field shop. The basic concept could also be expanded to painting the ballerinas with a range of colors and adding additional embellishments to coordinate with any party, not just a Swan Lake party.

miniature cupcakes

Such a clever idea to use mini reese's peanut butter cups as miniature cupcakes...
Top with icing and smaller sprinkles than what you used for the regular cupcake and you've got a quick and easy "miniature cupcake!" Solid chocolate brown cupcake liners for the regular size cupcakes can be found in the fort & field shop.

colorful caterpillar recipe

Cupcakes:
1 package vanilla cake mix
1 1/4 cups water
3 eggs
1/3 cup vegetable oil
food coloring

Preheat oven to 350 degrees and mix all ingredients. Bake for 21-23 minutes and let cool.

Buttercream Frosting:
1 cup butter
1 teaspoon vanilla
1/4 teaspoon salt
1 teaspoon meringue powder
1 tablespoon milk
1 package powdered sugar
assorted candies, candy-coated chocolate pieces, red string licorice, lollipops, and gummy worms 

Beat butter, vanilla, and salt. Add meringue powder and milk. Gradually add powdered sugar, beat at high speed until frosting is light and fluffy. Stir in food coloring until desired colors are achieved.

Frost cupcakes. Place one cupcake on its side towards the end of serving platter. Place second cupcake on its side next to first cupcake. Arrange remaining cupcakes, reserving two for the caterpillar's head. Decorate one of the reserved cupcakes with assorted candies, licorice and lollipops to create face and antennae. Place the second reserved cupcake upright at the front of cupcake row, top with face cupcake on its side. Cut gummy worms into small pieces, attach to caterpillar body with frosting to create legs.

Recipe and picture via Fun Stuff Cupcakes.

Be sure to used white cupcake liners so the colorful cupcakes can be seen through the liner.

cupcake liner gift wrap

Flatten and layer varying sizes of paper cupcake liners (mini, standard, and jumbo) over the top edge of a paper bag affixing with decorative brads and bakers twine. Only have standard cupcake liners? Simply trim a little around the edges to get the varying sizes you need...